Chase - Learn

Chase - Learn

Recent Posts

test

Breaking

Monday, 2 April 2018

Buzzer with Arduino

April 02, 2018 0
Buzzer with Arduino

Overview
A buzzer or beeper is an audio signalling device, which may be mechanical, electromechanical, or piezoelectric. Typical use of buzzers and beepers include alarm devices, timers, and confirmation of user input such as a mouse click or keystroke.
Image result for buzzer


Interfacing the Buzzer

Connecting Buzzer to a microcontroller is really simple. The Buzzer uses only two pins GND, and a pin to any of the Arduino digital pin.

Image result for buzzer with arduino


Code
/*
* Buzzer and Arduino
*
*
*/
const int buzzer = 8; //buzzer to arduino pin 9

void setup(){
  pinMode(buzzer, OUTPUT); // Set buzzer - pin 8 as an output
}

void loop(){
  tone(buzzer, 1000); // Send 1KHz sound signal...
  delay(1000);        // ...for 1 sec
  noTone(buzzer);     // Stop sound...
  delay(1000);        // ...for 1sec
}

Ultrasonic Sensor (HC-SR04) With Arduino

April 02, 2018 0
Ultrasonic Sensor (HC-SR04) With Arduino
Overview
Ultrasonic Sensor allow you measure the distance to an object by using sound waves. It measures distance by sending out (transmitter) a sound wave at a specific frequency and listening (receiver) for that sound wave to bounce back.


Reading PIR Sensors

The HC-SR04 Ultrasonic Module has 4 pins, Ground, VCC, Trig and Echo. The Ground and the VCC pins of the module needs to be connected to the Ground and the 5 volts pins on the Arduino Board respectively and the trig and echo pins to any Digital I/O pin on the Arduino Board.

In principle, the operation is as follows:

  1. sends a ping sound Trigger pin
  2. If an obstacle is trapped the wave is reflected back.
  3. the Echo pin receive the signal returned

The time taken allows us to determine the distance between the sensor and the barrier.

connection with Arduino:

Arduino PinSensor Pin
POWER 5VVCC
Digital 7Trig
Digital 8Echo
GNDGND

Code
/*
* Ultrasonic Sensor HC-SR04 and Arduino
*
*
*/
// defines pins numbers
const int trigPin = 7;
const int echoPin = 8;
// defines variables
long duration;
int distance;
void setup() {
pinMode(trigPin, OUTPUT); // Sets the trigPin as an Output
pinMode(echoPin, INPUT); // Sets the echoPin as an Input
Serial.begin(9600); // Starts the serial communication
}
void loop() {
// Clears the trigPin
digitalWrite(trigPin, LOW);
delayMicroseconds(2);
// Sets the trigPin on HIGH state for 10 micro seconds
digitalWrite(trigPin, HIGH);
delayMicroseconds(10);
digitalWrite(trigPin, LOW);
// Reads the echoPin, returns the sound wave travel time in microseconds
duration = pulseIn(echoPin, HIGH);
// Calculating the distance
distance= duration*0.034/2;
// Prints the distance on the Serial Monitor
Serial.print("Distance: ");
Serial.println(distance);
}

PIR Motion Sensor With Arduino

April 02, 2018 0
PIR Motion Sensor With Arduino


Overview

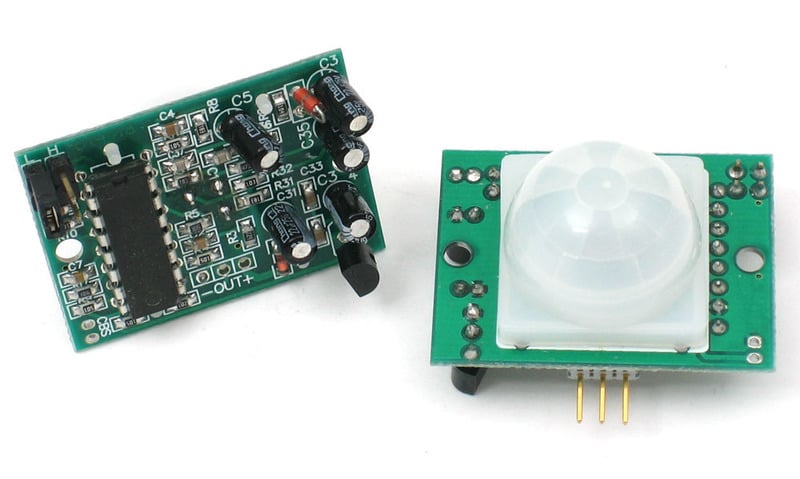
PIR sensors allow you to sense motion, almost always used to detect whether a human has moved in or out of the sensors range. They are small, inexpensive, low-power, easy to use and don't wear out. For that reason they are commonly found in appliances and gadgets used in homes or businesses. They are often referred to as PIR, "Passive Infrared", "Pyroelectric", or "IR motion" sensors.
proximity_pirsensor.jpg

Reading PIR Sensors

Connecting PIR sensors to a microcontroller is really simple. The PIR acts as a digital output so all you need to do is listen for the pin to flip high (detected) or low (not detected).
Its likely that you'll want reriggering, so be sure to put the jumper in the H position!
Power the PIR with 5V and connect ground to ground. Then connect the output to a digital pin. In this example we'll use pin 2.
proximity_pirardbb.gif
The code is very simple, and is basically just keeps track of whether the input to pin 2 is high or low. It also tracks the state of the pin, so that it prints out a message when motion has started and stopped.


/*
 * PIR sensor tester
 */
 
int ledPin = 13;                // choose the pin for the LED
int inputPin = 2;               // choose the input pin (for PIR sensor)
int pirState = LOW;             // we start, assuming no motion detected
int val = 0;                    // variable for reading the pin status
 
void setup() {
  pinMode(ledPin, OUTPUT);      // declare LED as output
  pinMode(inputPin, INPUT);     // declare sensor as input
 
  Serial.begin(9600);
}
 
void loop(){
  val = digitalRead(inputPin);  // read input value
  if (val == HIGH) {            // check if the input is HIGH
    digitalWrite(ledPin, HIGH);  // turn LED ON
    if (pirState == LOW) {
      // we have just turned on
      Serial.println("Motion detected!");
      // We only want to print on the output change, not state
      pirState = HIGH;
    }
  } else {
    digitalWrite(ledPin, LOW); // turn LED OFF
    if (pirState == HIGH){
      // we have just turned of
      Serial.println("Motion ended!");
      // We only want to print on the output change, not state
      pirState = LOW;
    }
  }
}